Wednesday, July 18, 2012

1 product that does EVERYTHING

Its always hard to find a product that u can have multiple use for, and if more products were like such, things would be so much easier! well... There is one product that you can totally use for EVERYTHING. Hair, Skin and body...!! So what product am I talking about?!?!?!!?!
Aloe Vera Gel! Yes! Not only can u use it for LITERALLY everything, its super inexpensive!!!

Aloe Vera Gel is usually used to heal scars, great for moisturizing skin, and keeping acne in control. BUT that's not all! It has internal benefits as well for joint pain and reducing inflammation, and keeping the digestive tract regular! 

I usually get the organic one from store, but I came across this one and its working just fine! The greatest thing about it is, I use it on my body, face and my hair!!!! 

It has been keeping my hair feeling AMAZZZZZZZZINGGG, soft and shiny!! 
So I take a little dab, while my hair is still damp and then run a comb or brush through to distibute evenly! It works as an awesome detangler and makes your hair feel weightless!
EVERYONE should have this and use it daily! Best stuff ever!!!!!! 

Aloe Vera Gel can be found at your local grocery store, drug store, and vitamin store!

For Acne this product is great, but u can add a few drops of Tea Tree Oil and apply it as a spot treatment, or all over!

Wednesday, June 27, 2012

Restoring Sun damaged Hair!!!

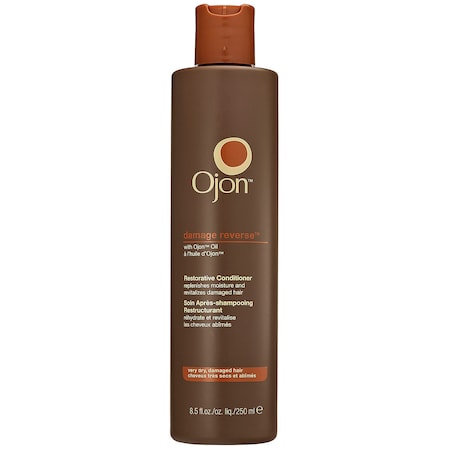
My Favorite product from Birchbox:

Ojon Damage Reverse Restorative Conditioner
This product works wonders with dry hair. Especially when you're out spending hours at the beach or in the sun in general, hair tends to deal with the worst end of it. Hair becomes dry and fraily. This product is the perfect solution for dry dull hair! Here's why:


Why I love it so much? I've been using it for the past few days and it has made my hair amazing!!! Since I only had a sample --and my hair isn't very dry, its more normal if anything.. I mixed it with my regular conditioner and recently, Ive applied it just to my ends (since they end up drying out the most). Its made my hair feel stronger, smoother, extra shiny and it still has body. 


Product Detail: This lush, concentrated daily conditioning balm doesn t just sit on the surface. It actually surrounds dry, brittle hair with nourishing lipids including pure Ojon oil, nature s golden elixir, Brazilian Buriti Oil and Murumuru Butter. Helps seal in vital moisture and create the perfect buffer against daily damage. Instantly detangles. Hair looks healthier, silkier, smoother and shinier. 

Retail Value: 25.00 USD

Can be purchased at Ojon.com/ Sephora.com and other Beauty online retailers 

**Like many of you, I did sign up for Birchbox, My Glam and GlossyBox. I've cancelled my subscription to 2 of them and awaiting on Glossybox. But I won't get into why I did for this blog entry.


Monday, June 25, 2012

ACNE BE GONE!

So I, like many people, suffer from Acne- and unfortunately this method, hasn't worked for me but (as I have mentioned previously-those products do solve a lot of problems that come with Acne, i.e. discoloration, scarring, marks, whiteheads, blackheads, flaky skin etc.
I have come across many sources including GOSSMAKEUPARTIST-on Youtube.com as well as ACNE.ORG that would back this up.

First use a:- Mild cleanser, the less chemicals the better. Many people have recommended Cetaphil. I have both the regular one and the sensitive one- One is foamier, while the other one is lotionish- or a milk cleanser- or a soap bar (glycerine based preferred or Olay/Dove) usually work really great.

Use a Benzoyl Peroxide Topical ( this does not work for me because I'm fairly positive I do have an allergic reaction towards BP. I usually get super blotchy and a bit swollen in the face with a small application, therefore I can not use it. Apply all over area instead of just on spots.. generously. This comes in 10% or 25%. I recently found out Walmart carried it in the generic brand and it is not costly AT ALL. (Benzoyl Peroxide kills bacteria that lies deep inside the epidermis that cleansers may not get to, although you will experience dryness, using an emollient moisturizer + sunscreen will help minimize excessive dryness. 

Third- Use Moisturizer as well over sunscreen.

This should bring your acne down DRAMATICALLY.

I told my sister about this a few weeks ago. She had whiteheads/papules all over her face especially from cheek to jaw line. Shes a bit lazier but has done this all week with a few natural masks, in the past 2-3 days and it has gone dramaically! Mind you, this is someone crazy who just went to the Derm, and was recommended ACCUTANE! for the 2nd time. :S

She was gonna start on an Accutane regimen, with antibiotics (oral) and  Retin-A topical= HOTMESS for 2-4 months before even her skin gets to a decent place.

 If you have specific questions for this regimen, or acne products please leave them below!!

** This regimen is super affordable and can make a huge difference on your skin and in your life! 


Friday, June 22, 2012

More Fav Products!

So, I've put this off for a while- and since Ive been excessively buying products, I thought I'd more to my list. I was thinking monthly but my schedule's kinda off now so I'll just add as I go.
So, today someone told me my skin looked "great", and it was kinda in the dark but regardless of the fact that I did wear makeup today, I generally NEVER do. Just b/c I'm always afraid of breaking out bc it happens randomly... as well as I just don't need to wear it.
I prefer just working on my skin and getting it to a place wear makeup is not really needed- like in my early 20s (sad).
Anyway- So here are some things I've been using!


Elizabeth Arden Peel & Reveal Revitalizing Treatment, 1.7 fl. oz.

What it Claims: This intensive retexurizing treatment brings skin the natural protective powers of cabernet grapeseed extract and the exfoliating capabilities of alpha and beta hydroxies - in one simple brushstroke. Lift away dullness, dry flakes and surface signs of stress. Discover new texture and tone as pores look diminished and fine lines seem to fade away. Reveal skin that is visibly firmer, incredibly smooth, clearly glowing.

My take:  Back when I worked for EA, I ordered this to try it. Back then it was amazing and it still is! I Know EA reformulated it and I have not tried the new formula but I am sure some of the EA counter's still carry it. Or you can find it at like a TJMAXX for 1/3 of the cost!
Great exfoliant, especially for sensitive skin. You can use it once a week or 2x. This makes your skin incredibly smooth and soft. It also takes away the dry patches or any flakiness and is super easy to peel off. It dries off in about 15mins and the best way to take it off is from the jaw upwards. I like the brush, for an even application- that is not super thin or too thick but using the fingers works well too. Tho my skin is more on the oily side, this product balances the oils out more than anything. Im totally obsessed with it. Definitely worth the try!

Cost: 12.00-36.00 USD

AT-Home Brazilian Peel


What it claims: An at-home, professional-strength peel with four once-a-week applications. The Brazilian Peel firms skin, reduces fine lines and wrinkles, and helps you maintain a radiant, youthful complexion. Formulated with 30-percent glycolic acid, the nourishing antioxidant açaì, and the innovative Q-Mag Neutralizer, Brazilian Peel is the first professional-strength peel designed to deliver deeper, long-lasting results at home.


My take: I ordered this off ebay, for one application. The actual product comes with 4. Its a tad pricey so I thought I'd try it first. A friend recommended this product and absolutely fell in love with it. She was having issues with Acne. Since Acne happens to be an on-going battle and I tend to get lazy with the amount of work that goes into "keeping skin clean" jk..I wanted to try it as well.
First thing's first, it definitely reduced the marks in my face = success or as some of you may call- "winning"..
Another huge benefit, with just one application was the fact that it made my skin more even-toned. So double winning.
The application, "Clear" which is a newer formula, comes in a syringe like apparatus which has 2 formula's when pushed out together, and mixed the formula becomes "active" which lasts about 10 mins. So for those who don't know, chemical peels with 30% glycolic acid, ususally are used in Spas or medical settings supervised by a professional but this is something that you can do it home.

Asides from a bit of tingling and followed by  tightness of the face for a few days, there is virtually no down time- THAT means now harsh peeling, extreme redness, or swelling. But if that does happen, call the doc! Haven't heard or seen it yet..

**A little secret: So since the formula doesn't activate till you push out, you can use 1/2 of the syringe first and 2nd 1/2 later- so that's 8 applications vs 4-
** And since it only works for about 10 mins, even if you leave it on, you won't burn your skin- unlike some formula's.
 Price: 12 for 1 app, on Ebay but 78.00 USD @ Sephora!

If you want even tone skin, brighter skintone and clearer face definitely worth every penny!!

Hope you like! If you do get to try these or have tried them I would love to hear your experience!
Pls comment below!
Ammara


Thursday, June 7, 2012

Latest Drug Store Obsession


 Attending this year's THE MAKEUP SHOW in NY, I got a little surprise!!! At Johnny Lavoy's Seminar,  we got L'oreal's Fiber Lash Mascara <3 It is SUPER amazing, not just because Johnny was just the biggest sweetie for giving us one, but because it is actually super goodd!!! One of my Favorite Mascaras actually was a fiber mascara made by Shisiedo but I love this one b/c its like an ALL IN ONE!
Why I LOWE this Mascara:
+ Doesn't dry in the bottle
+ The first coat comes on super dark, so eye liner is not necessary
+ Applying more coats doesn't make it chunky or clumpy
+ The fiber's create length while the formula creates mega VOLUME!
+ Doesnt feel stiff when applied
+ Great Price
+ Cute Bottle
ETC. ETC. ETC.

In conclusion, the name says it all.. and I definitely won't need fake eyelashes for this baby!

Sunday, April 15, 2012

A Bold Impression Makes a Lasting Impression..


Bold lipsticks are seen everywhere, from Holly wood to runway. Bold Lips completes an outfit, compliments skintone, and works like an accessory. For my latest work, I used MakeupForever Rouge Intense #36. Its an ELECTRIFYING PINK that lasts all day long  For more Tania and Dru's look,  leave a comment and I will add product deets for my next entry!

Monday, January 23, 2012

Get The Face: "EYE M GLAM" (Kim K inspired) Look!


  Hi All!
This is my first time doing a “Makeup tutorial”. I didn’t get a chance to record it, so I'm doing a Step by Step.  *We named this look “EYE M GLAM”- Since the product-most used (because it’s so versatile) is EYEMGLAM by Mario Dedivanovic aka KimK’s Makeup Artist ! (Whom I just met 2 weeks ago at his Seminar!)
My friend and I had put this off due to our conflicting schedules and finally got a chance to meet so we decided to go for a “Kim K” look. If everyone finds this helpful we will probably do more!

 We had sooooooo much fun doing this look which turned into a mini-makeup lesson! We added Hair and Styling too!  Taans is flawless without makeup, and with… She’s “Eye M Glam”!!

 To Purchase and get more info on this product Click Link Below
Eye M Glam EVERYWHERE!+ Tips I learned from the Seminar!
  xoxo
Ammara


*** For this look, I did use whatever my friend normally uses on her face such as her moisturizer and foundation***

Face:
1. Taans uses Oil Of Olay's Moisturizer for her skin so we used it all
over skin! - Keeps the skin looking smooth and hydrated! Didnt feel greasy
at all!
2. For her Foundation I used Estee Lauder's Double Wear Liquid
Foundation* ( A good rule of thumb is using one that matches your skin
exactly- going a shade lighter if you have even skin is okay, but the best
idea is to match exactly and use a highlighter to bring out a glow to the
skin).
* Applying foundation with a damp sponge helps blend and sets foundation
( I used Beauty Blender and Sephora's Beauty Blender)

3.  I set the foundation with a Loose Powder - this all depends on what
feels right for you, and color wise as well- I've used different kinds, the
one I have now is Arbonne's Loose Powder Light to Medium, Cover FX
Setting Powder- this is more Transluscent, so it all depends. Estee-Lauder
has great setting powders!
* Apply with A puff, press it onto the skin and brush off access powder.

Eyes:
1. I used Elizabeth Arden Teak Eyeshadow (any matte eyeshadow in olive
to brown color will do) with Nars 05 Eyebrow Brush
* Starting from outer upper corner of brow bone,  filling in the edges light-handedly.
This gives it a more natural look, and if it’s too light u can always go
back and apply more to darken, if needed. Applying in the direction of hair
growth is the key. Finally, adding towards the edge of the start of
eyebrow- Do not go all the way in and keep towards bottom edge- otherwise
they start looking too DRAG.

2. I applied MAC Concealer all over lid (the kind that comes in a pot)
with Nars08 Concealer Brush all over lid. I set it with loose powder.
Using a blending brush until everything is covered, under the brow to lid,
nice and even.  ( after this, or sometimes over the concealer I use Urban
Decay Primer Potion
Eye Primer or Eye Prep + Prime by MAC or any
concealer really.)

3. Starting with the inner corner of the lid I used a copper eyeshadow, I
mixed a few from random palettes I had, working (patting it in) 3/4 in. So
that means from inner corner 3/4 towards outer corner.
 Blend it in with a fluffy brush.  I used a Flat Shadow Brush I was working between MAC
239
, and blending with a Tapered Blending Brush by Nars.

4. Taking a Darker chocolate color, (mixed a few), < > shape to outer
corner and blend in to crease in a back and forth motion till its evened
out. Using a Matte taupe shadow- Take a blending brush and go back and
forth above crease from outer crease corner all the way to the bridge of
nose- this creates a little shadow and adds depth to eyes with contour.
Start with a Dense Blending Brush and use a Tapered Blending Brush to blend out, when  blending apply up and outwards rather then out and down.

5. Using Black Eyeliner Estee Lauder Automatic Pencil Duo and line 
the eye. I normally make a line in the middle, and then work the outer
corner in, sketching up to the inner corner- I’m not that great with lining,  applying light handed and creating small lines- (like tracing alphabet
letters in kindergarten helps "---")   with a Flat Liner Brush

6. I took the eyebrow brush I used earlier, blended it out, creating a
wing at the ends, connecting up to almost touching the crease line.
*ALMOST!- it gives u a good ending point, u dont wanna go too far out and
look weird).

7. I used  Milani  Liquid Liner - (my friend swears by it)
Trace over the Eye liner. You can blend a bit more and then add lashes.

8. I used Makeup Forever 157 Eyelashes. These are absolutely AMAZING!
My friend bought them to use,  they were super full with the perfect length! I
applied the glue it came with and mixed it with DUO Lash Glue, let it
sit for 30 seconds and lightly blow  until the glue becomes tacky and
applied- set them in the middle and push down to fit the lash line, middle to inner and outer corners.

** Curl the eyelashes- Taans used Lancome's Lash Curler I returned my Shu
Uemura's
Lash curler b/c Ive used better, one being Shiseido's 1st Lash Curler,  a long
time ago and it was amazing. THE NEW ONE is :S!! :( Its made for flatter
eyes and it pinches on me  so I dont recommend it unless u have flat eyes.
So which ever u like and are comfortable with!

8. Apply *MASCARA* from the root up,  I used MAC Mascara- I cant remember
which one but it accidentally fell into my lap- so to speak- I did pay for
it, but the girl at the counter gave me the wrong one, its not great- I
went to get the Zoom something but yea My second coat was Loreal Lash
Extension Duo
- I got this at the Seminar its not bad-- the other side had
brown bronzy sparkles with a round wand that brings out hazel eyes? so for
this look it went cuz of the eyeshadow pigments.

9. Using EYE M GLAM Highlighter, apply in the inner corner and lining right above
eyeline.

10. I re-lined the lashes with *Milani Eyeliner *for a clean finish.* *

11. I lined the water line with a White Eyeliner, by (E Tude).

12. Add coat to bottom lashes- I started with the Black end of Loreal Mascara

Under Eyes:

12. Using ELF Make Up Wipes,  (*cut in 4ths, its pretty big), wrap
around index fingers, and wipe access shadow- and mascara from underneath
the eye- from inner corner to outer corner and clean edges right at the
outer corner crease that was created, Once you do that- U can use whatever foundation was left and touch up the eye area to clean it up and even skin tone

13.Take ( I like 2 concealers) one to nuetralize the dark circle- which the
color matches more of the actual circle- and one thats lighter to brighten
the skin- I used a palette which had like correctors in mint, yellow and
purple but which ever works for you--
* A cool tip I learned from Goss Makeup Artist
(hes British and amazing!)- If you have bags, where you see the line of the
bag- take a light conealer ON that line and blend in, dont go out of it or
in it just blend it in and it makes the bag go away- 

14. Over that, Apply a Cream Based Concealor  I just used Taan's  MAC and
set it with a loose powder using a sponge. - This gives it that KIM K
conceal!


15. Using the Darker Eyeshadow, apply it under the eye- outer corner- in.
and blend it out.  Using a brown shadow or liner, line right under water
line, and blend- this gives it a nice smokey affect.

Contour: 
1. Giving the Face a Slimmer look and making the cheekbones stand out
we
did some contouring, using a Blush Brush, I used ELF-Contour Brush* and
applied - Estee Lauder Soft Matte Bronzer, in the hallows of the cheeks.
(you can find those by sucking in your cheeks) - I recently got this brush and its super great, if you want to create a bolder contour use a blending shadow brush or something denser, and blend it with a fluffier brush so there are NO harsh lines. -

2. I mixed it with MAC Taupe  Powder, *to give a nice bold
contour, applying it at the jawline, and under neck. Using Estee Bronzer,
at the outer area of the forehead, and blending it in the hair lines.

3. Taking a Dome Brush like ELF Dome Brush, go down the sides of the
nose to slim down nose,  and at the tip/under nose. **This gives the
appearance of a shorter slimmer nose

Cheeks:

I used Estee lauder over it ( on the cheeks) and added a mix of peachy
coral blushes to the apples of the cheek and blend into bronzer.

Take EYE M GLAM- and a Fluffy Brush- I used Sigma Highlighting Brush- and
applied EYE M GLAM over cheeks, Nose and Cupids Bow! For the PERFECT GLOW!

Lips:

1. Line the lips, b4 using EYEMGLAM on Cupids Bow, above lip- If you wanna
clean the lip line or lipstick, use a concealer and set with powder so the
lipstick stays in place!- I used a nude color

2. Using Mac Pink Plaid, fill in the lips with a Flat Brush, easy to
blend and stay within the lines. I used EYE M GLAM LIPGLOSS- I think its
still in the making but its like MEGA AMAZING and the perfect shimmery rich
lipgloss like a peachy orange- but its perfect. or mix EYEMGLAM with clear
gloss/ sheer gloss to create the look!

and now ur all done! U can use a finishing Spray over the face to set it in!

Hope these directions helped! If this does, *PLEASE COMMENT* and let me
know! and Ill do more looks! This was the first one, and honestly detailing
product and direction TAKES FOREVER!! I wanna explain it as best I can so
its easy to do! Hope you enjoy and try the look- Take pics and lemme know!

- add them on my Facebook Page!!
  Ammara Rana Makeup Artist
 Tootles!

P.S. Hair for this look will be on next post! Stay Tuned...

Before:                                                                            After: